Introduction to Digital Activist
Digital-Activist.org is an initiative by The Movement Hub at Greenpeace.
The aim of the platform is to help grassroots groups and movements amplify their impact with a diversity of digital campaigns.This guide covers the Social Storm and Phone Jam tools which allows groups to organise activists for a coordinated response on social media platforms - Twitter, Facebook and Instagram and through mobile phones.
This guide will take you step-by-step through the process of creating a Social Storm or Phone Jam campaign as well as answer questions about the tool. You can also read the Terms and Conditions and Privacy Policy for questions related to use of platform and data.
How to build a Social Storm
Social storming is a concept that has been used by various groups and institutions to elevate a topic or coordinate a response on social media. On Twitter, this could mean putting pressure on a Twitter account to act or simply making a hashtag trend. On Facebook and Instagram, it could be used to organise a swarm of comments on a public page or post.
This guide helps you understand various aspects of setting up a campaign and helps you build a campaign step by step for up to 3 different social media platforms at a time - Twitter, Facebook and Instagram.
This is the default platform for Social Storms where you can create multiple Tweets for supporters to send mentioning a target in the Tweet.
Facebook & Instagram
Facebook and Instagram are treated slightly differently to Twitter. Rather than creating a post, this enables supporters to comment on a post from a target. You can enter the text you want them to use which will appear as a comment on your target’s post on either Instagram or Facebook. These options will not be turned on by default but can be activated in the Social Storm settings.
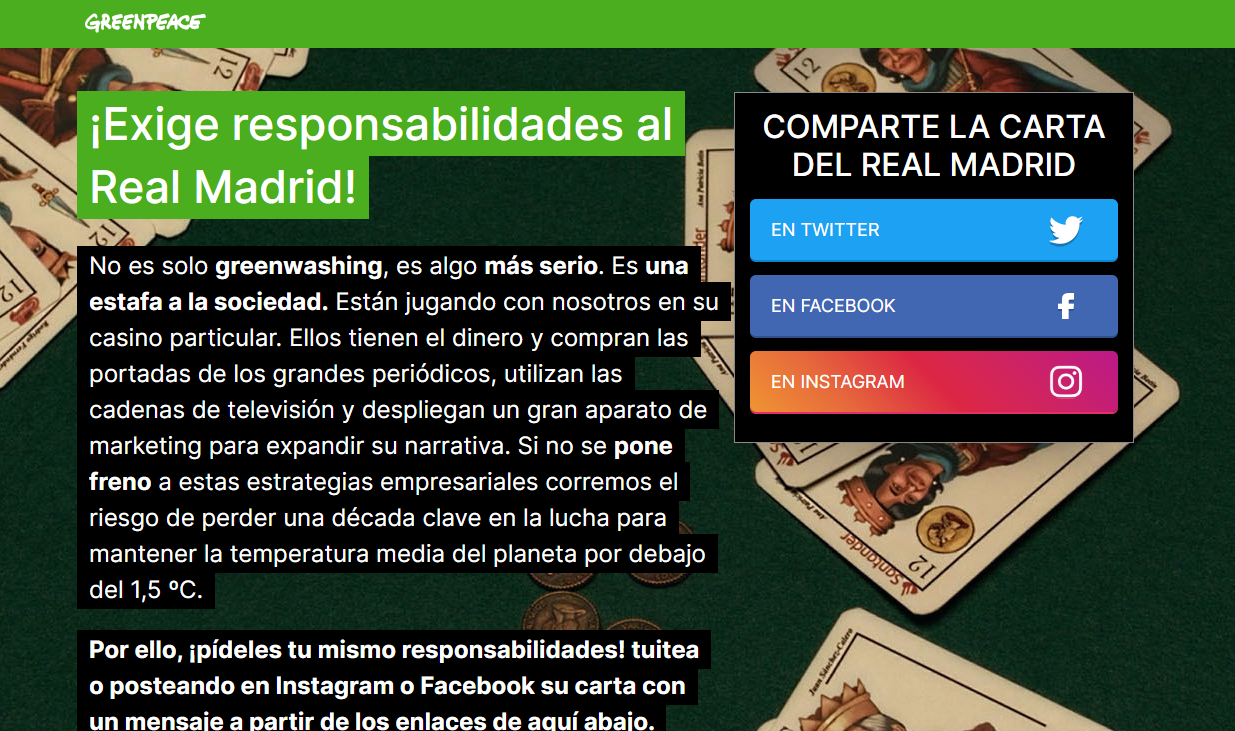
Here is an example Social Storm using Twitter, Facebook, and Instagram:
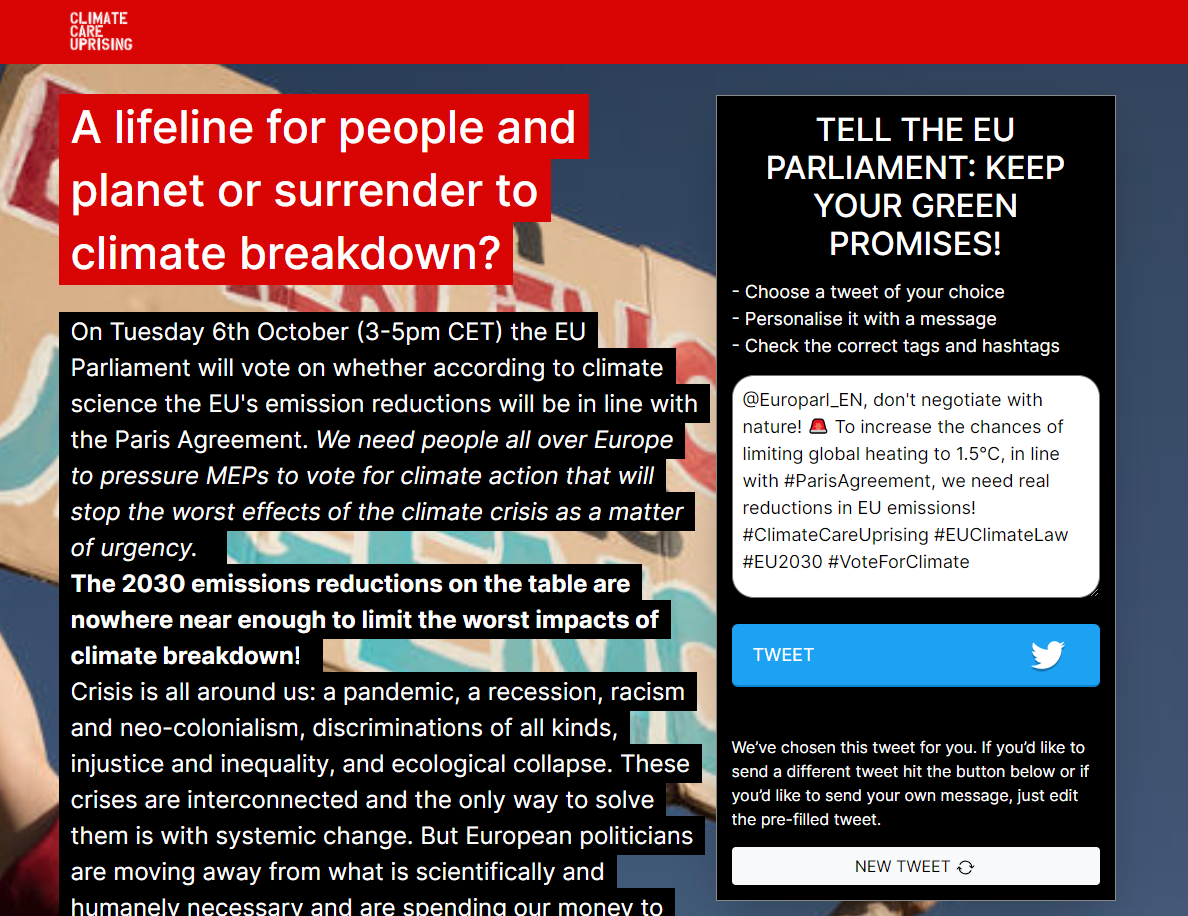
And here is an example with just Twitter:
Creating a New Campaign
It's very easy to create a new Campaign - you can either duplicate an existing one, or create a new one from scratch.
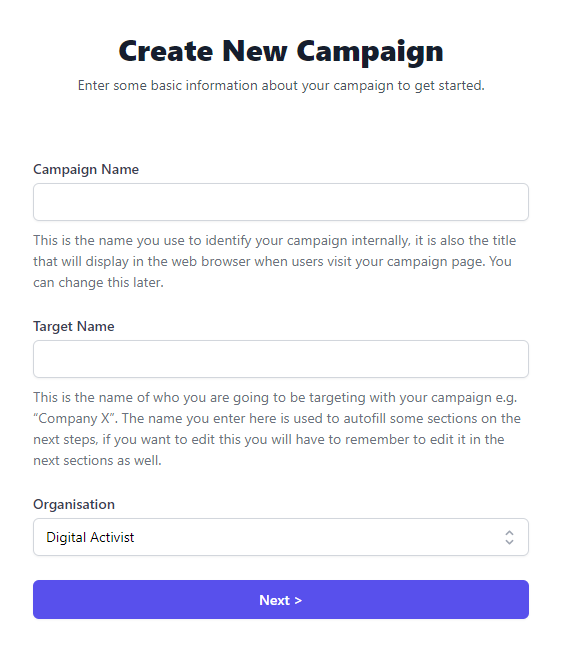
To create a new one from scratch - just click the “Create New Campaign button”:

To duplicate an existing campaign - simply click on the “duplicate” icon on the main table:
You will be asked for 3 key bits of information to get your campaign started:
- Campaign Name - This name will be used to reference your campaign internally but will also be shown on the browser tab. You can change this in the General settings once the campaign is created.
- Target Name - we will use this to create the default text for your campaign. Once you’ve entered this, it cannot be re-done, although you can manually go and edit every field that it pre-fills at any point
- Organisation - some users may be part of multiple organisations, therefore you can select which organisation this campaign belongs to. Once you have selected and saved an organisation for a new campaign it can’t be changed.
If you duplicate an existing campaign, it will take the “Campaign Name”, “Target Name” and “Organisation” from the campaign you have copied.
Important
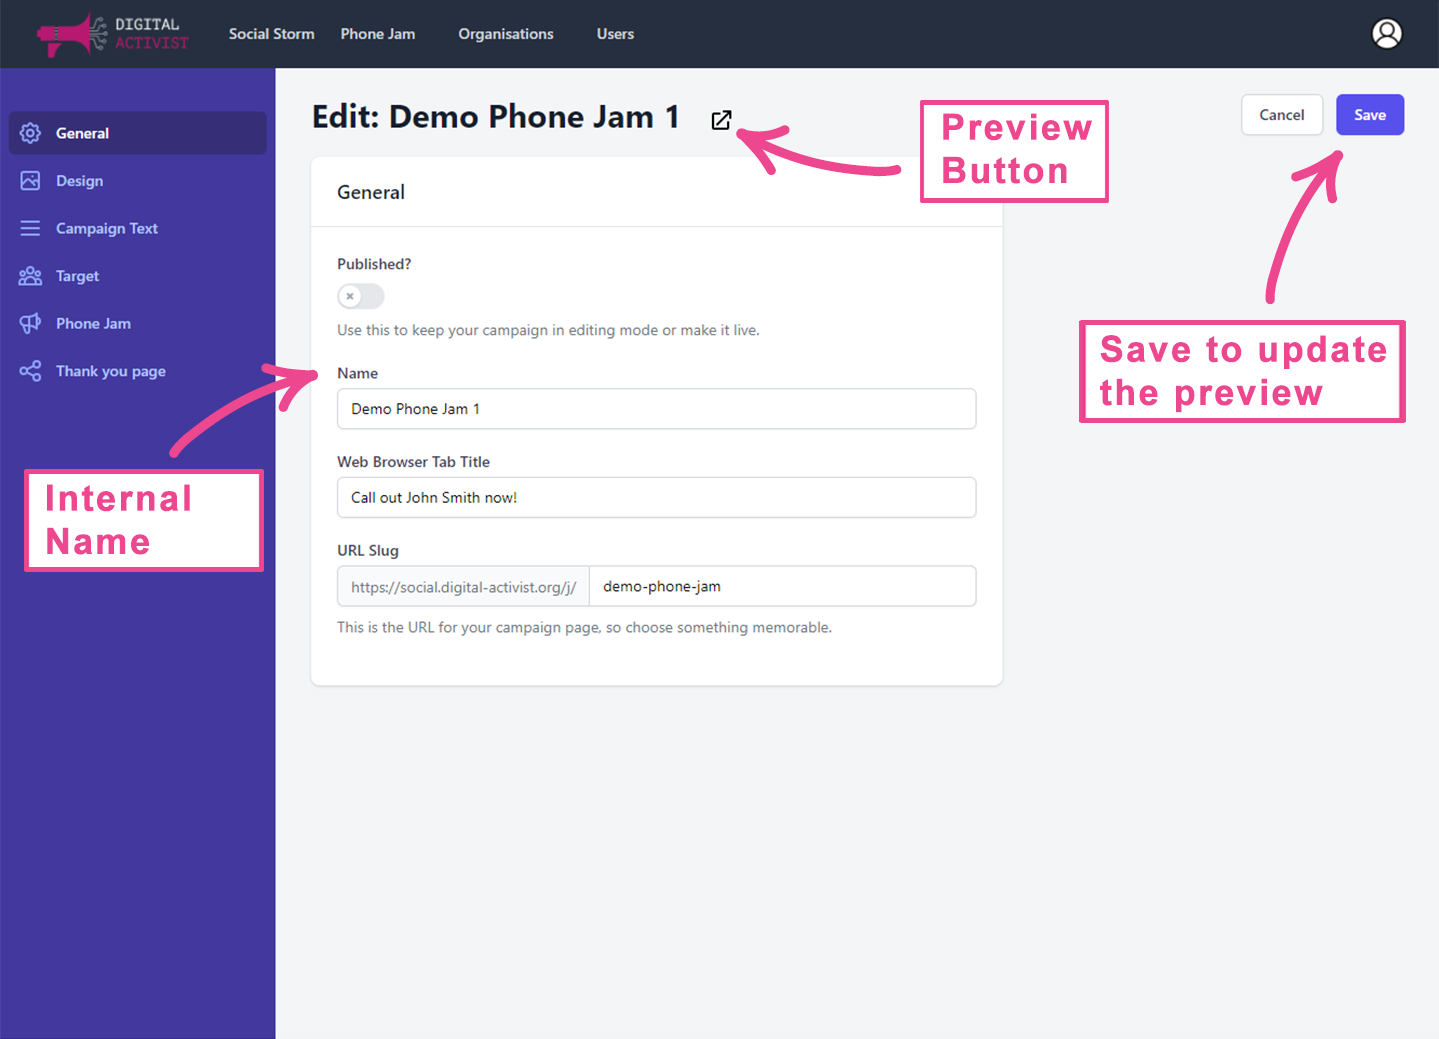
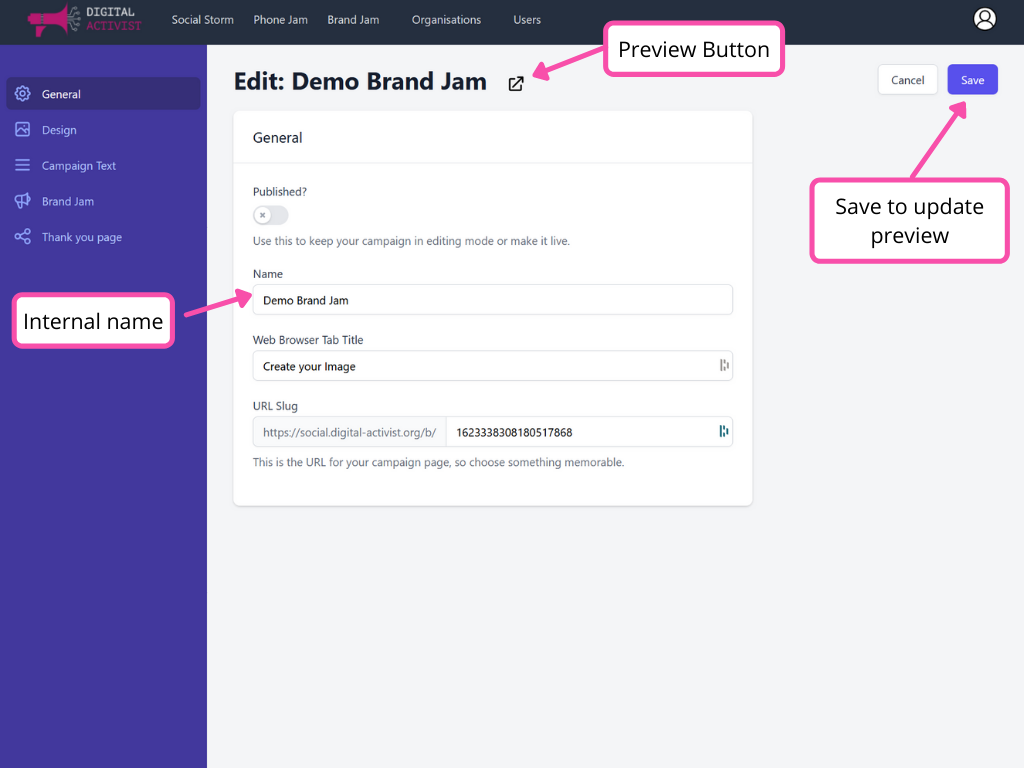
Changes you make will not be saved automatically. Make sure to regularly save any edits you make so these are not lost. Changes will also not be reflected in the page preview until they have been saved.General tab
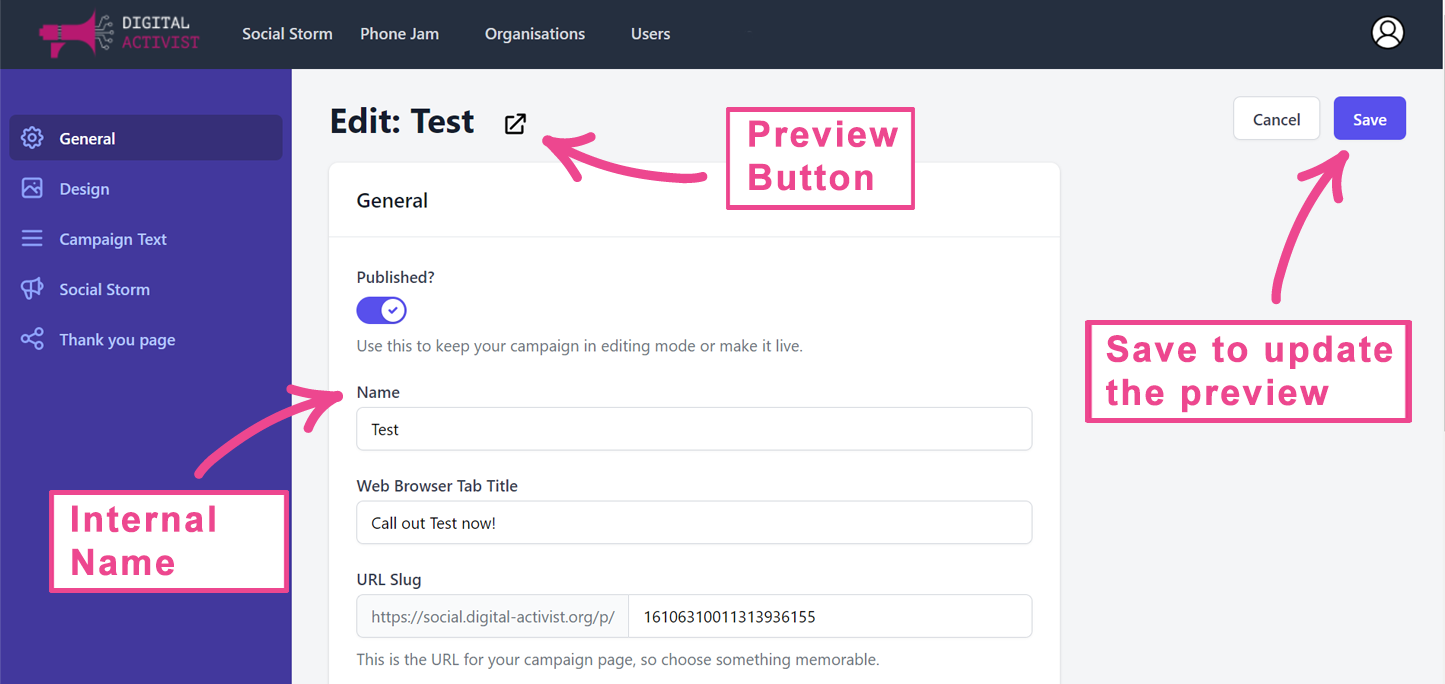
This where you can edit the general settings of your campaign:
- Published - decides whether your campaign can be viewed by the public or not. You can still look at pages that haven’t been published by adding “?preview=true” to the end of the URL. The “preview” links do this for you automatically
- Name - this is only for internal use so you can find your campaign easily
- Web browser tab title - this is the page title that will be shown in the web browser tab.
- URL Slug - this is the link that your supporters will use to access the page - we recommend customising it with words so that it’s meaningful. Warning: if you change this after you’ve already given out the link, then people will no longer be able to reach it.
Design tab
This is where you can customise the appearance of your Social Storm.
It automatically uses the default settings from your Organisation, this is something that would have been preset for your organisation when you were set up.
You are free to change any of the settings and it will only affect this Social Storm:
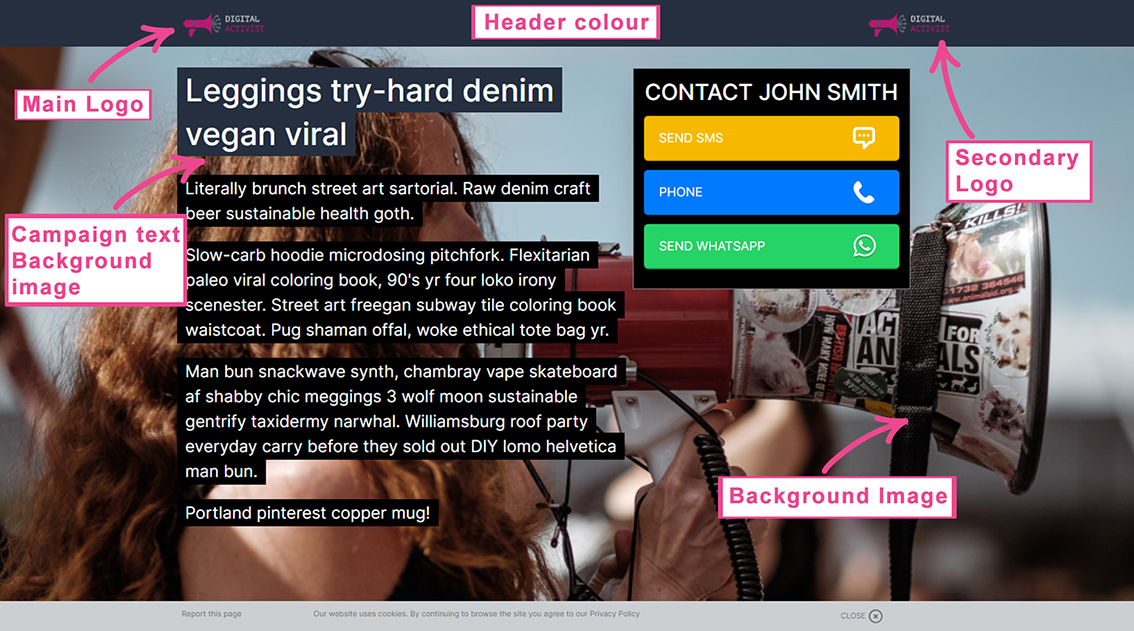
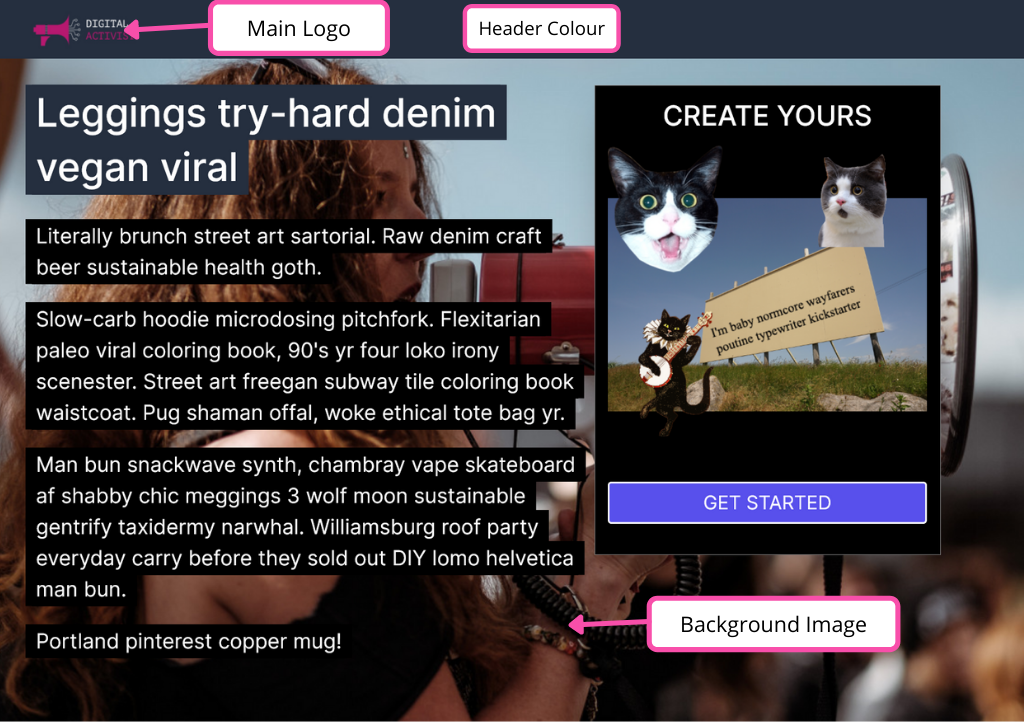
- Main Logo
- Secondary Logo [optional]
- Browser Icon
- Header Colour
- Background Img
- Button Colour
- Campaign Text - Background Colour
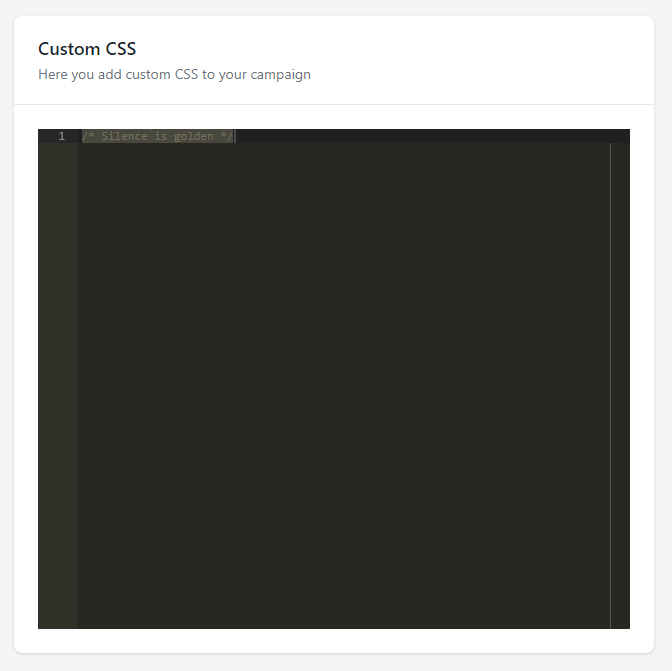
CSS Editor
There is a section in the Design Tab where you can add custom CSS to further customise the look of the page including overriding default colours, fonts etc. This requires some basic web development knowledge.
Campaign Text tab
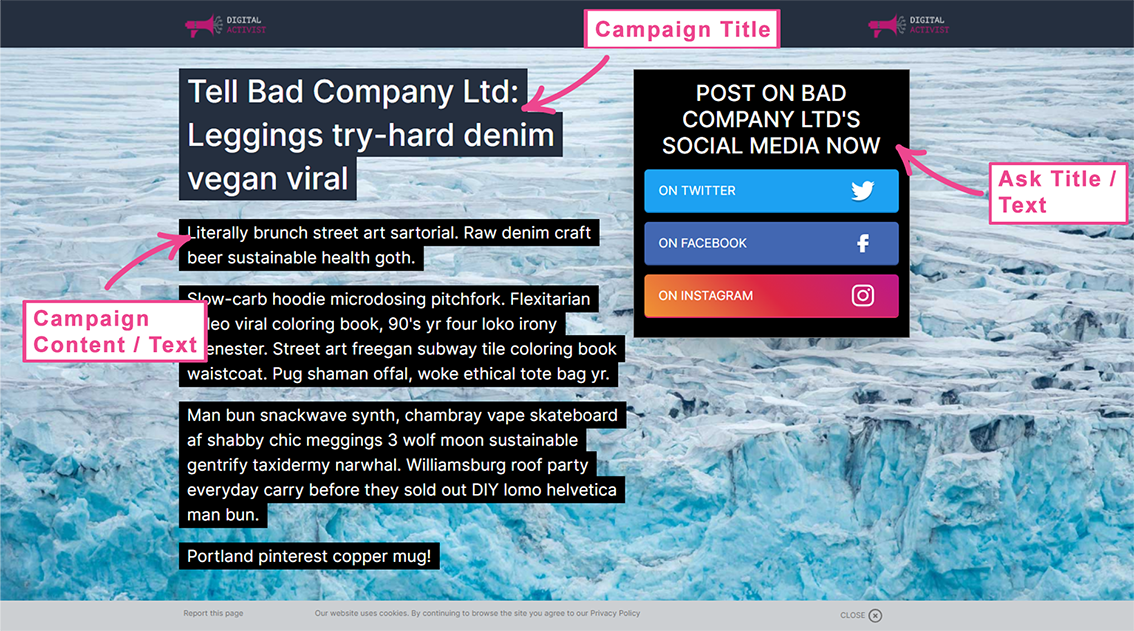
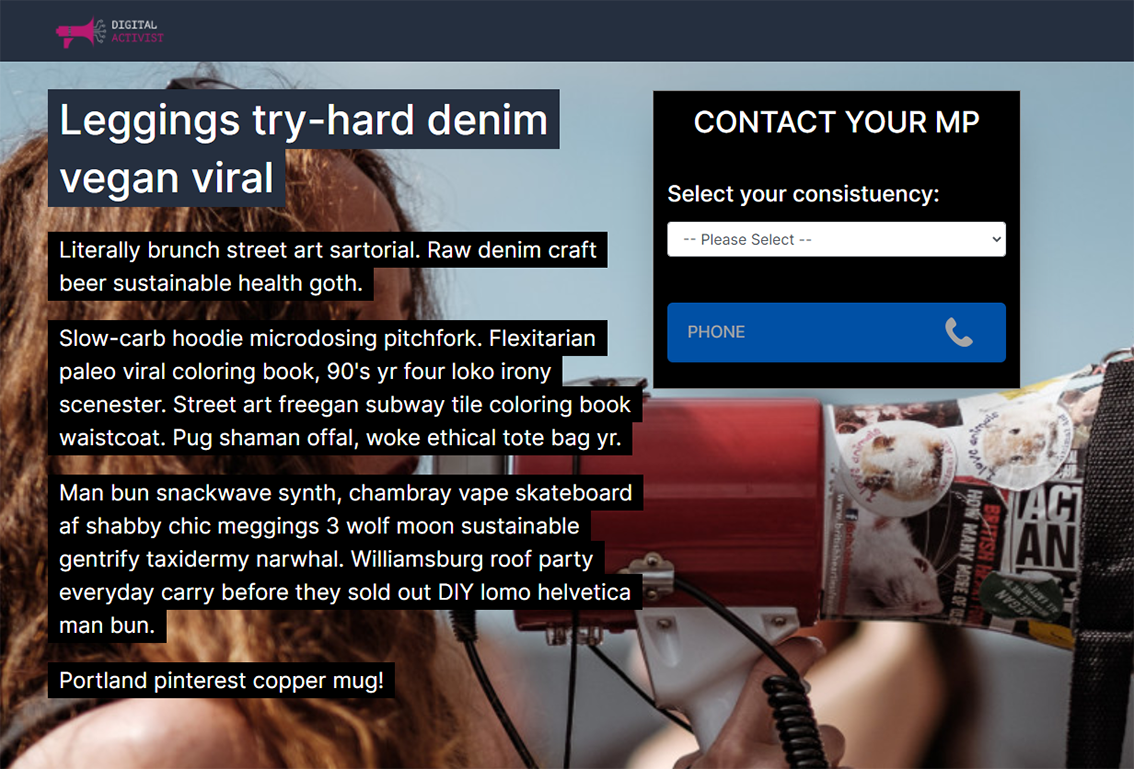
This is where you edit the text which the supporter sees when they first land on the page:
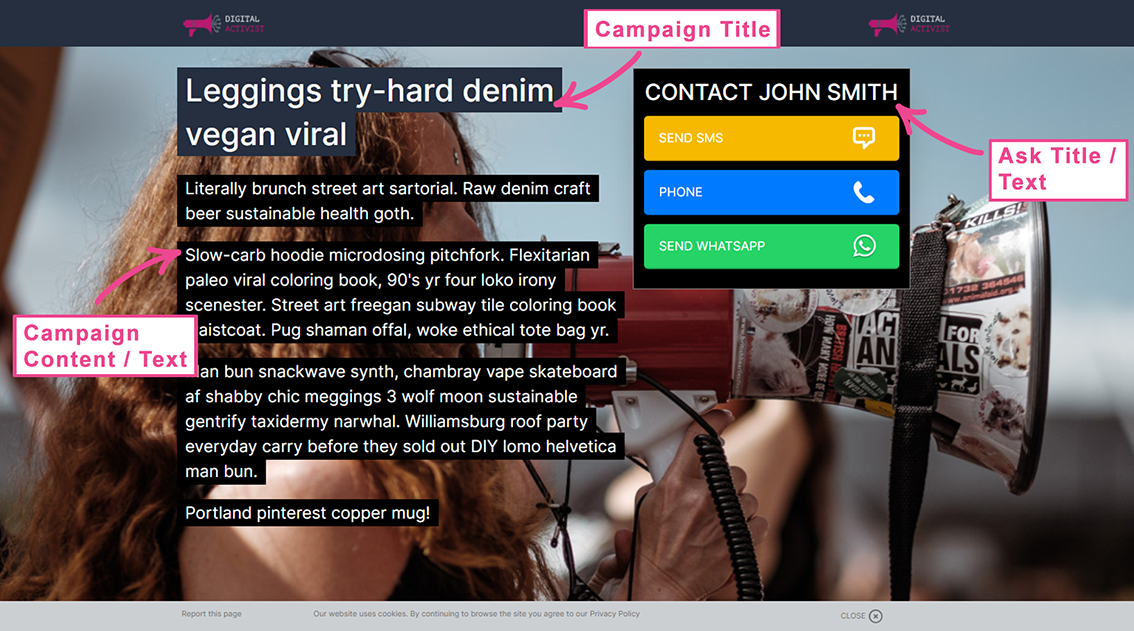
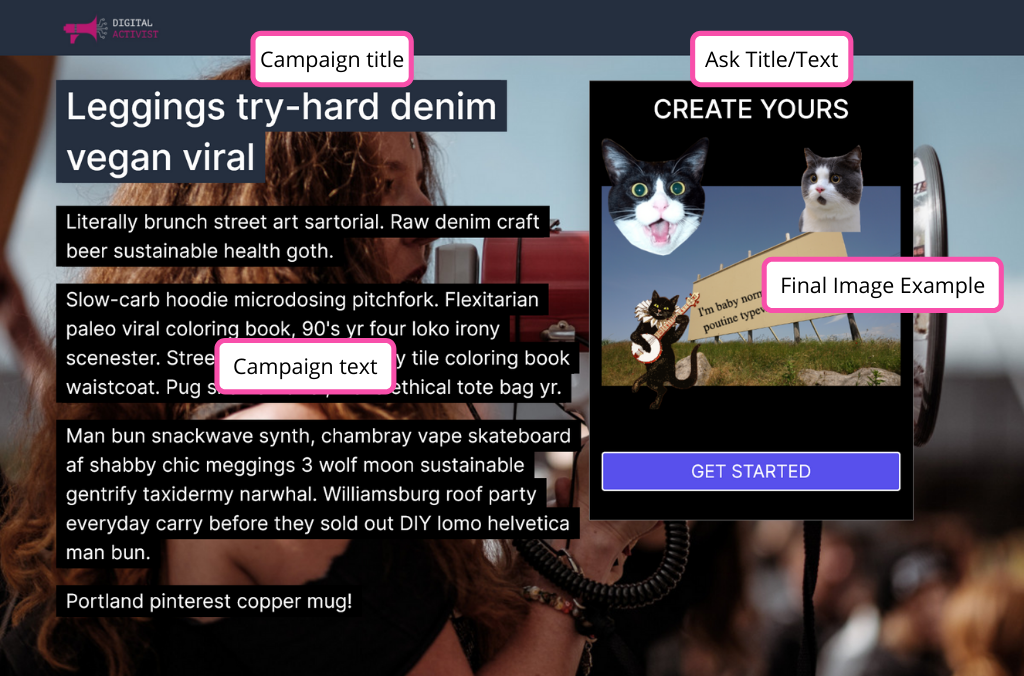
- Campaign Title
- Campaign Content / Text
- Ask Title / Text
Tip:
When copying text from Word, Pages or Google Docs, the formatting will be copied over. Sometimes this can cause design issues. You can quickly remove this by using the “Remove formatting” button or by copying your text into NotePad or TextEdit and making it plain text, then copying it into the Campaign Content/Text box.Social Storm tab
You can select which social media you want to enable by toggling them on / off on the different tabs - you can have any combination of the 3 social media.
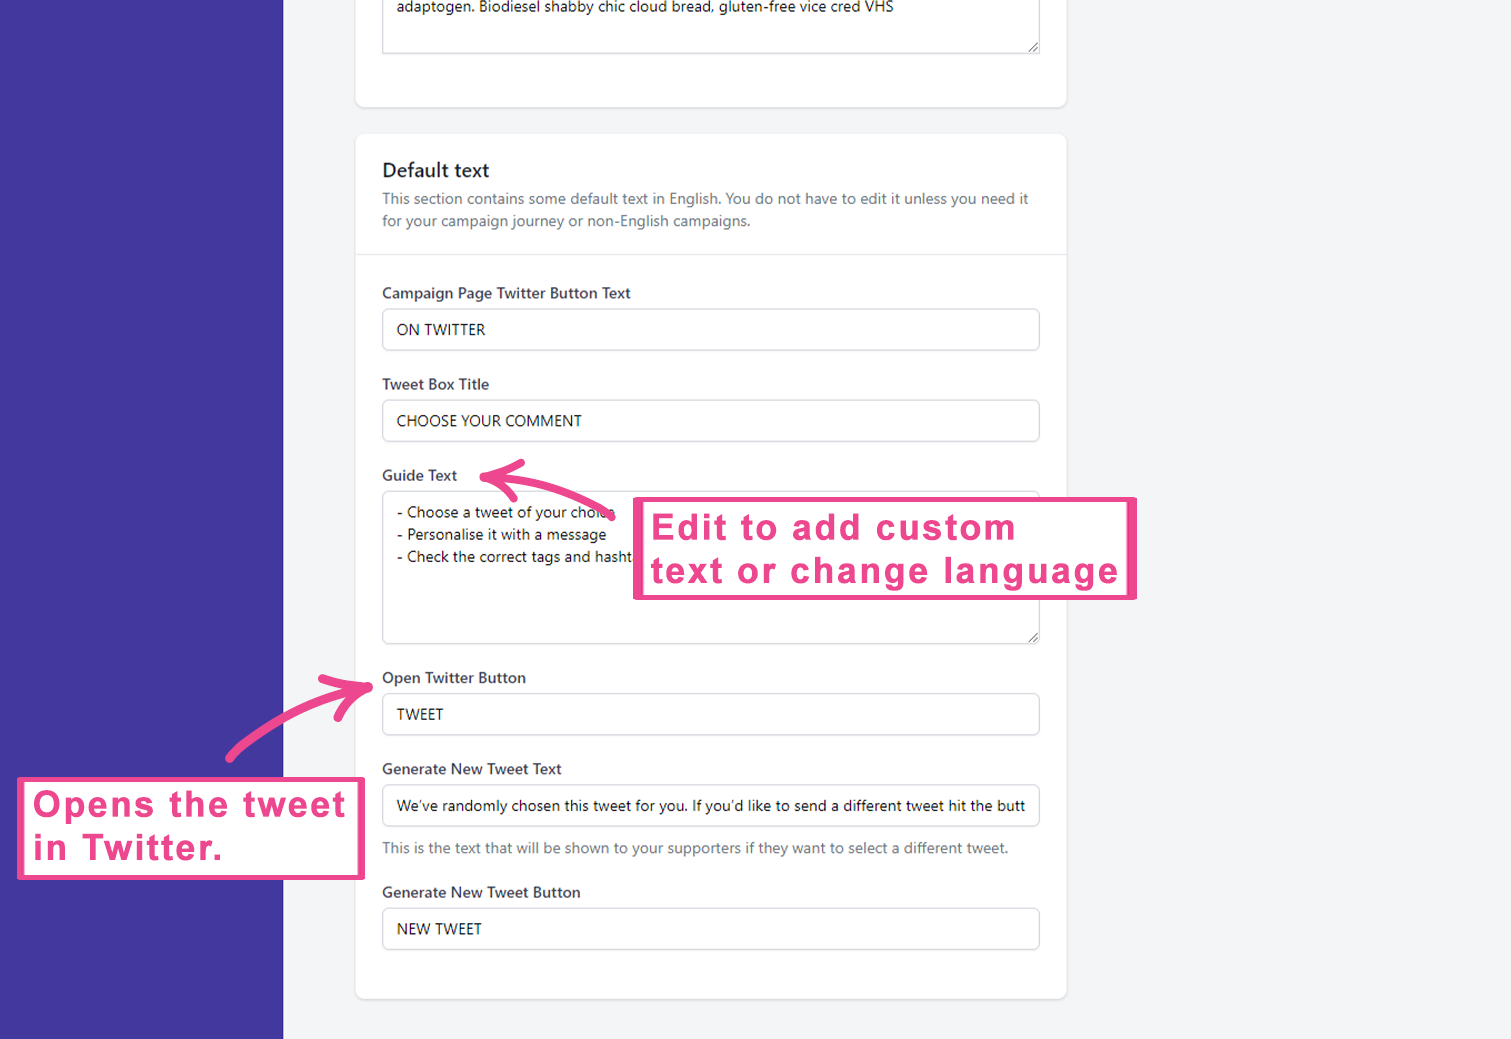
For each social media you can also edit the pre-filled tweets / comments that supporters can choose between - simply click “Add new tweet / comment” and change the text.
There is also “Default text” which instructs the supporter on how to use the tool - you can leave the default or you can customise. The default text will always be in English, however you can enter any language here to change it.
Facebook & Instagram
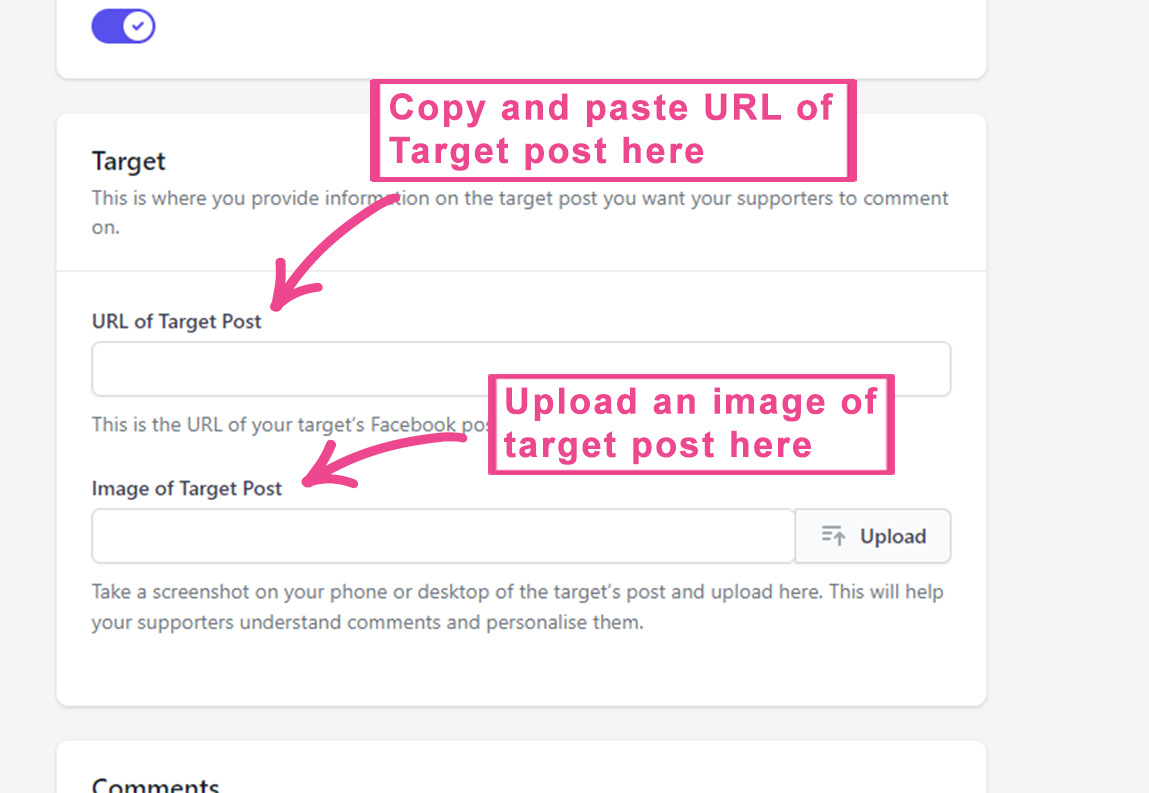
Since Facebook and Instagram storm asks supporters to storm a comment with post, to use these two platforms as part of your Social Storm there are a few more steps. First, these options will not be enabled by default, click the “Enabled?” slider to activate them.
You will then need to copy the URL of a Facebook and/or Instagram post from your target’s account and paste it into the “URL of Target Post” field. This is where you want your supporters’ comments to appear.
It’s a good idea to include the image from your target’s Facebook or Instagram post as well. You can do this easily by taking a screenshot (Cmd+shift+4 on Mac, Windows button + shift + S on Windows, then select the area around the image and save it). Upload this image in the “Image of Target Post” field so your supporters will see the post they are commenting on.
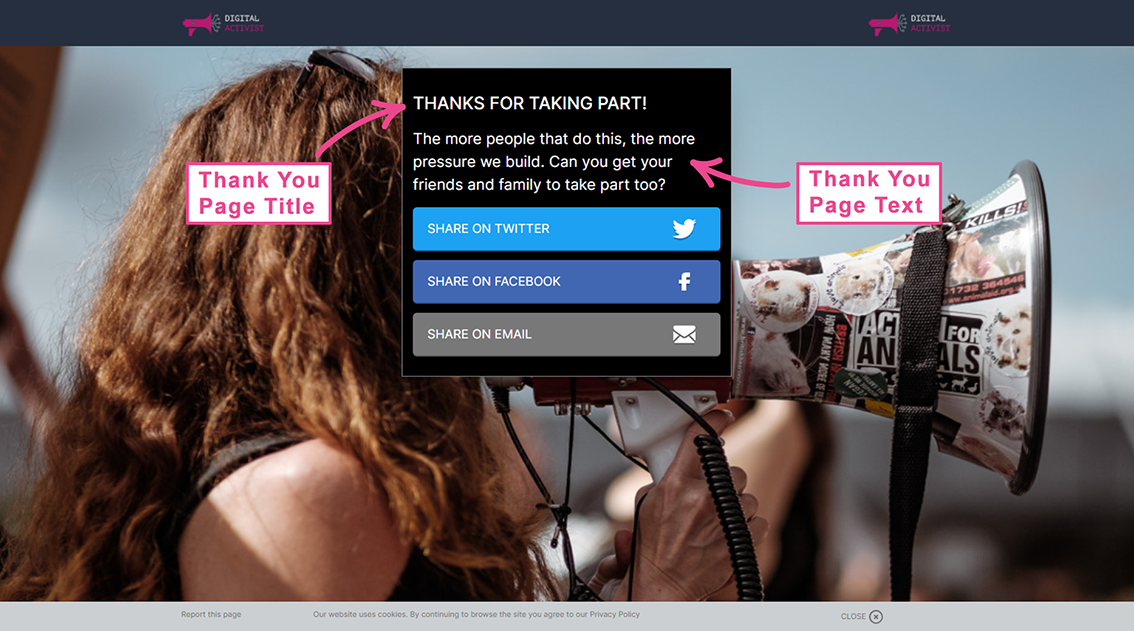
Thank you page tab
Once the supporter has completed the ask, they will be taken to a Thank you page. You can use this page to encourage your supporters to share the Social Storm with their friends and family:
- Thank you page Title
- Thank you page Text
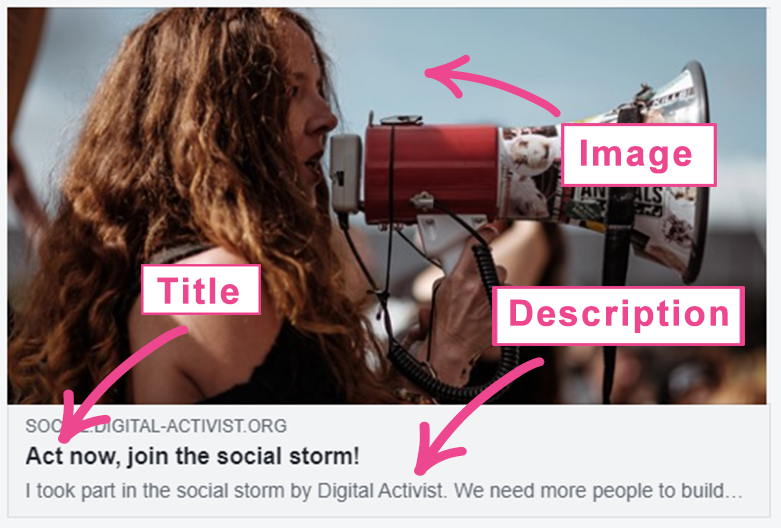
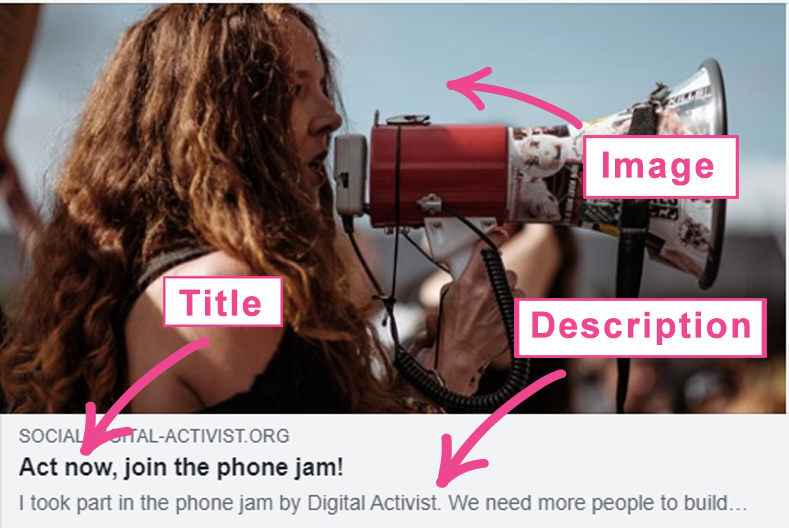
You can also customise how what your Campaign looks like when it's shared on social media:
- Title
- Description
- Image
Here's a preview of how your campaign will look like when shared:
To help encourage your supporters to share your Campaign, you can enable share buttons:
- You can write a pre-filled Tweet for your supporters to share or leave this with the default text or blank.
- To add the link of your storm into the tweet, you just need to type {{link}} where ever you want the link to appear within the text
- WhatsApp [only shows on mobile devices]
- You can write a pre-filled message for your supporters to share or leave this with the default text or blank.
- To add the link of your storm into the message, you just need to type {{link}} where ever you want the link to appear within the text
- You can write a pre-filled email and subject line for your supporters to share or leave this with the default text or blank.
- To add the link of your storm into the email, you just need to type {{link}} where ever you want the link to appear within the text
- Skip
- You can turn on the “Skip” button which allows you to add an extra button under the sharing buttons. You can enter custom text to appear on this button and a custom URL which they will be redirected to after clicking on this button. This button can be helpful if you want your supporters to go to your website, Facebook page or a news article after they have participated.
Publish
When you’re ready to launch your Social Storm, remember to go to the General tab and click the “Published?” slider. This will make it visible to the general public.
How to build a Phone Jam
Phone Jamming is a tactic that allows your supporters to take your campaign message right to your target by calling them on the phone or by sending them a message.
It’s a tactic that has been used as long as phones and campaign groups have existed, Digital Activist’s Phone Jam tool makes it easier to build and monitor the progress of a Phone Jam campaign.
There are three options for your supporters to contact your campaign target(s): phone calls, SMS and WhatsApp messages.
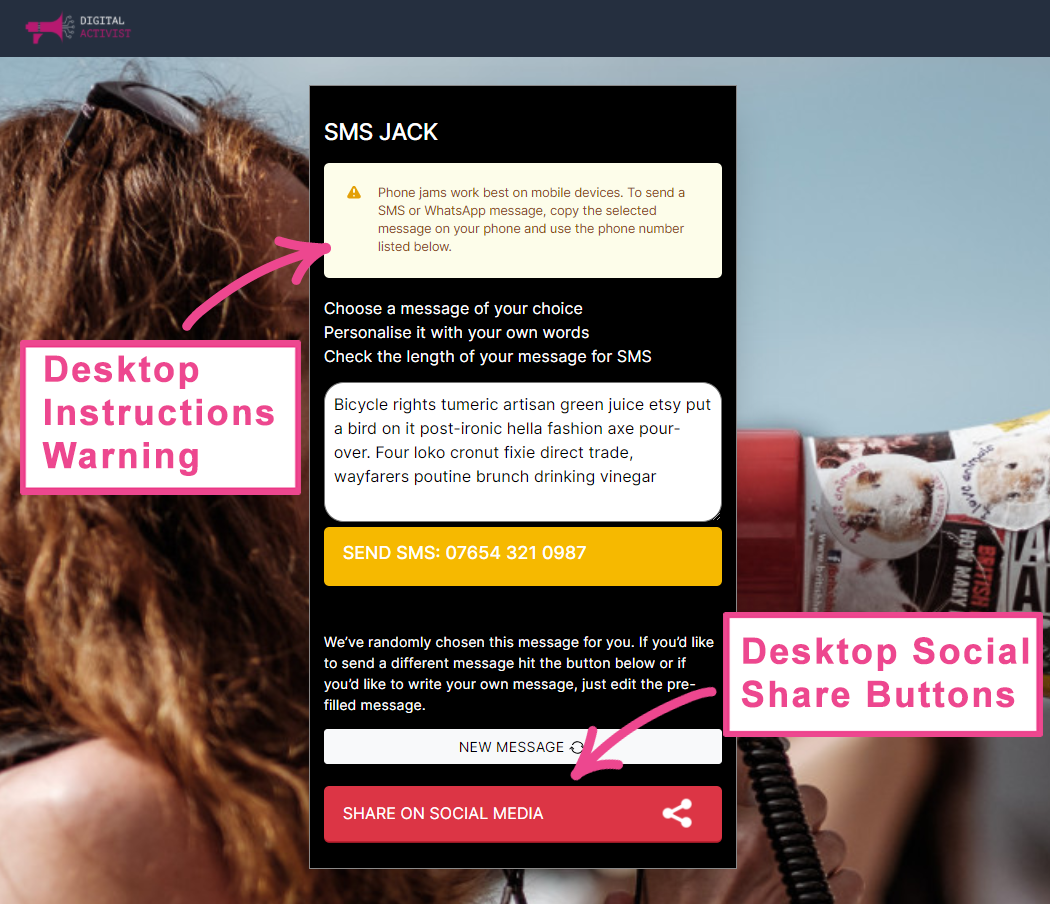
Phone Jams work best on mobile devices, supporters can click the button to call or send an SMS and it will open automatically in their default app. On a desktop, laptop or tablet, supporters will be prompted to select an app or type the number and text into a phone.
Note:
Phone Jam does not offer a calling, texting or WhatsApp service, it will only open your supporters apps on their phone for the right function. Any phone calls, SMSs and WhatsApp messages will be sent from your supporters phone number.Here is a sample Phone Jam that targets Members of Parliament offices through Phone only:
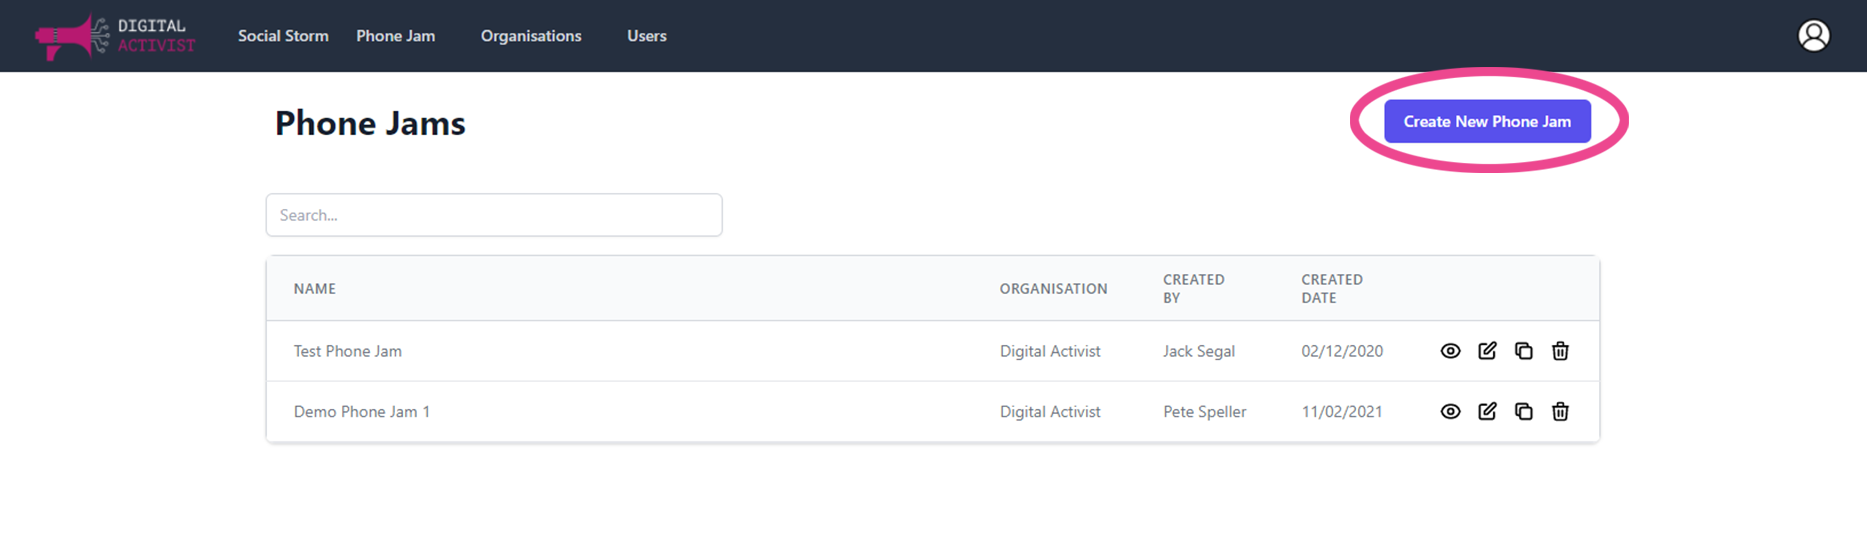
Creating a New Phone Jam
It's very easy to create a new Phone Jam Campaign - you can either duplicate an existing one, or create a new one from scratch.
To create a new one from scratch - just click the “Create New Campaign button”:
To duplicate an existing campaign - simply click on the “duplicate” icon on the main table:
You will be asked for 3 key bits of information to get your campaign started:
- Campaign Name - This is the name you will use for your campaign both internally and externally. It will be displayed in the browser tab, so make sure it’s something you’re happy for the public to read. You can define a separate internal-only name later.
- Target Name - This is the name of the target for your Phone Jam. It will be automatically added to some sections of the Phone Jam. Once you’ve entered this, it cannot be re-done, although you can manually go and edit every field that it pre-fills at any point. If you have multiple targets, you might want to put a company name or collective name in here e.g. “Company Name Ltd” or “Government Ministers”.
- Organisation - This is the name of your organisation. Some users may have multiple organisations so make sure you select the right one!
If you duplicate an existing campaign, it will take the “Campaign Name”, “Target Name” and “Organisation” from the campaign you have copied.
Important
Changes you make will not be saved automatically. Make sure to regularly save any edits you make so these are not lost. Changes will also not be reflected in the page preview until they have been saved.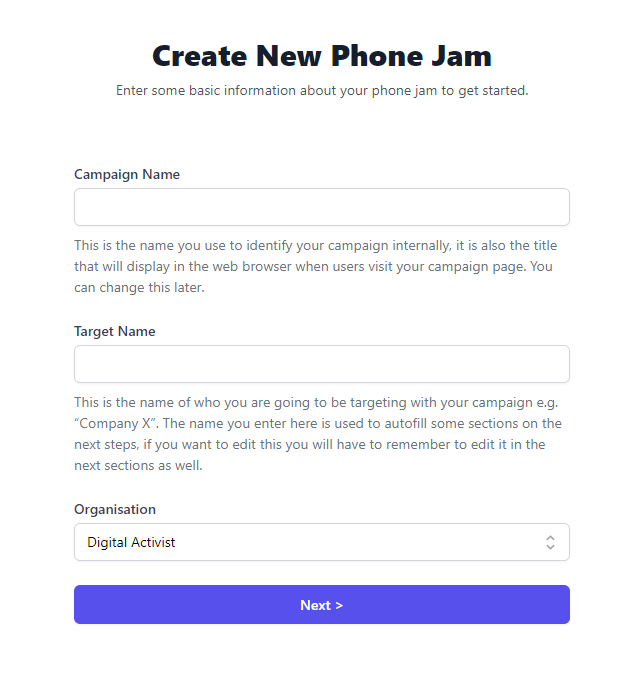
General tab
This where you can edit the general settings of your campaign:
- Published - decides whether your campaign can be viewed by the public or not. You can still look at pages that haven’t been published by adding “?preview=true” to the end of the URL. The “preview” links do this for you automatically
- Name - this is only for internal use so you can find your campaign easily
- Web browser tab title - this is the page title that will be shown in the web browser tab.
- URL Slug - this is the link that your supporters will use to access the page - we recommend customising it with words so that it’s meaningful. Warning: if you change this after you’ve already given out the link, then people will no longer be able to reach it.
Design tab
This is where you can customise the appearance of your Phone Jam.
It automatically uses the default settings from your Organisation, this is something that would have been preset for your organisation when you were set up.
You are free to change any of the settings and it will only affect this Phone Jam:
- Main Logo
- Secondary Logo [optional]
- Browser Icon
- Header Colour
- Background Img
- Button Colour
- Campaign Text - Background Colour
CSS Editor
There is a section in the Design Tab where you can add custom CSS to further customise the look of the page including overriding default colours, fonts etc. This requires some basic web development knowledge.
Campaign Text tab
This is where you edit the text which the supporter sees when they first land on the page:
- Campaign Title
- Campaign Content / Text
- Ask Title / Text
Tip:
When copying text from Word, Pages or Google Docs, the formatting will be copied over. Sometimes this can cause design issues. You can quickly remove this by using the “Remove formatting” button or by copying your text into NotePad or TextEdit and making it plain text, then copying it into the Campaign Content/Text box.Additional: Manual Send text (if error)
An additional field for support text in case the buttons do not work on a unique mobile device. Does not need to be changed except might need to be translated if the campaign is in a language other than English.
Desktop Users
The buttons on Phone Jam work best on mobiles as they open the appropriate application to call, sms or WhatsApp. So, we added the following two extra sections that only appear when someone is using a Phone Jam on a desktop:
Desktop Instructions/Warning
This is just a note for anyone using Phone Jam on a desktop explaining that they will need to use a phone for calling or messaging since the calling and texting buttons on the desktop are deactivated. You may change this warning to clarify what you want them to do or if you need to translate this to another language.
Desktop Social Share Button text
On mobile devices the Phone Jam automatically takes the supporter to the thank you page where they can share your campaign with their friends after they have taken action but since we cannot tell if they have participated on a desktop, this button guides them to the next step.
Target tab
This is where you define the target for your Phone Jam. You can select between a single target or multiple targets. Multiple targets allows you to upload a list of targets and their contact information. Best use for this is government officials or localised customer care numbers for companies.
Single Target
- First select the International Dialing Code for the country. This will be automatically applied to the phone number.
- In the Target Phone Number, enter the phone number in international format, not including the dialling code. For example, in the UK all phone numbers start with a “0” for domestic calls, 0044 or +44 for international calls. So the UK phone number 01234 567 890 would be entered 1234 567 890. In combination with the international dialing code, this will automate the number to be called or texted when supporters are using your Phone Jam on their mobile devices.
- Next enter how you want the number to appear on the page under the Public display of Phone Number. This does not affect the actual number that will be called. This is only to display the number on Desktop
Multiple Target
- Multiple targets need to be entered by uploading a spreadsheet in .CSV format.
- Download the sample data set and replace the dummy data with the data you want to use.
- You can replace the text for the drop-down label and placeholder.
- Note: You can access further instructions on preparing the data by clicking the link below the file-upload section.
Phone Jam tab
On the Phone Jam tab you can define the methods used to contact your target(s). You can choose any or all of Phone, SMS and WhatsApp.
Phone
- This is the default option and will be enabled. Click the slider to turn it off.
- In the default text section, you can edit the Talking Points to provide your supporters with some guidance on what to say when they call the target. You can also edit other default texts here or translate text if you are building the campaign in another language.
SMS
- SMS will be disabled by default. Click the slider to enable it.
- Click “Add New Message” to add at least one message you want your supporters to send. You can add more than one so that your supporters can choose the message they want to send.
- The default text section here let’s you edit the rest of the text if you are building the campaign in a language other than English. The Guide Text field is where you can add more guidance for your supporters on how to personalise or tweek the messages they are sending.
- WhatsApp is disabled by default. Click the slider to enable it.
- Click “Add New Message” to add at least one message you want your supporters to send. You can add more than one so that your supporters can choose the message they want to send.
- The default text section here let’s you edit the rest of the text if you are building the campaign in a language other than English. The Guide Text field is where you can add more guidance for your supporters on how to personalise or tweek the messages they are sending.
Thank you page tab
Once the supporter has completed the ask, they will be taken to a Thank you page. You can use this page to encourage your supporters to share the Phone Jam with their friends and family:
- Thank you page Title
- Thank you page Text
You can also customise how what your Campaign looks like when it's shared on social media:
- Title
- Description
- Image
Here's a preview of how your campaign will look like when shared:
To help encourage your supporters to share your Phone Jam, you can enable share buttons:
- You can write a pre-filled Tweet for your supporters to share or leave this with the default text or blank.
- To add the link of your storm into the tweet, you just need to type {{link}} where ever you want the link to appear within the text
- WhatsApp [only shows on mobile devices]
- You can write a pre-filled message for your supporters to share or leave this with the default text or blank.
- To add the link of your storm into the message, you just need to type {{link}} where ever you want the link to appear within the text
- You can write a pre-filled email and subject line for your supporters to share or leave this with the default text or blank.
- To add the link of your storm into the email, you just need to type {{link}} where ever you want the link to appear within the text
- Skip
- You can turn on the “Skip” button which allows you to add an extra button under the sharing buttons. You can enter custom text to appear on this button and a custom URL which they will be redirected to after clicking on this button. This button can be helpful if you want your supporters to go to your website, Facebook page or a news article after they have participated.
Publish
When you’re ready to launch your Phone Jam, remember to go to the General tab and click the “Published?” slider. This will make it visible to the general public.
How to build a Brand Jam
Brand Jamming is a tactic that allows your supporters to take your target’s own brand or images and add your campaign message to them. It doesn’t have to be your targets images, you could use any image relevant to your campaign that you want your supporters to customise and post on social media.
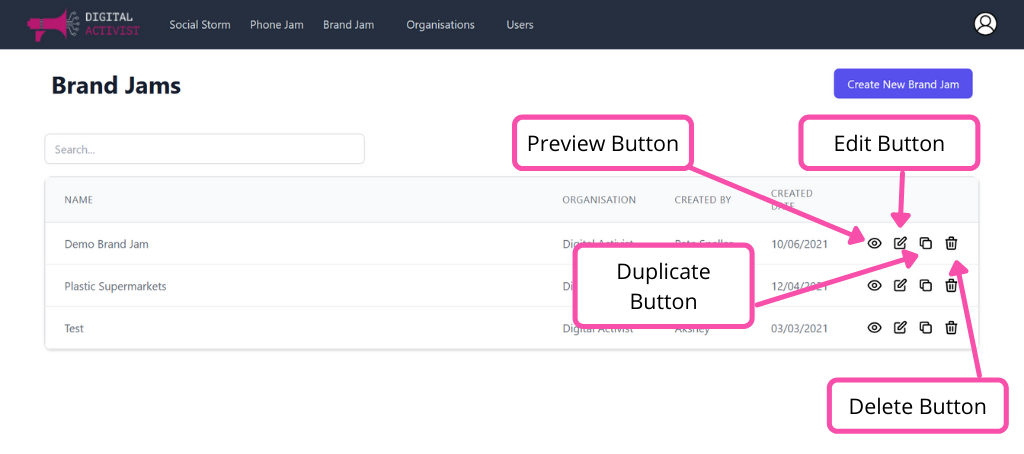
Creating a New Brand Jam
It's very easy to create a new Brand Jam Campaign - you can either duplicate an existing one, or create a new one from scratch.
To create a new one from scratch - just click the “Create New Campaign button”:
To duplicate an existing campaign - simply click on the “duplicate” icon on the main table:
You will be asked for 2 key bits of information to get your campaign started:
- Campaign Name - This is the name you will use for your campaign both internally and externally. It will be displayed in the browser tab, so make sure it’s something you’re happy for the public to read. You can define a separate internal-only name later.
- Organisation - This is the name of your organisation. Some users may have multiple organisations so make sure you select the right one!
If you duplicate an existing campaign, it will take the “Campaign Name” and “Organisation” from the campaign you have copied.
Important
Changes you make will not be saved automatically. Make sure to regularly save any edits you make so these are not lost. Changes will also not be reflected in the page preview until they have been saved.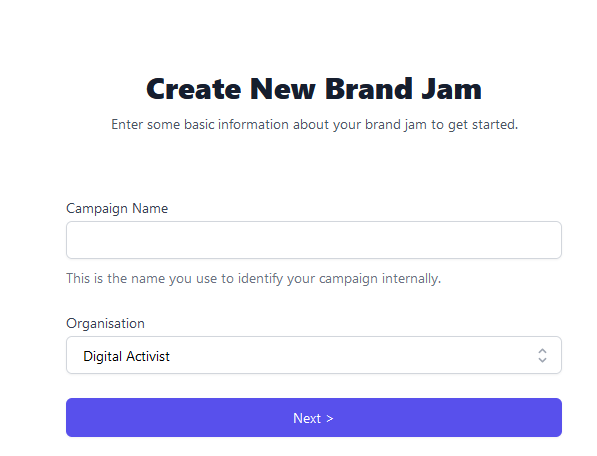
General tab
This where you can edit the general settings of your Brand Jam campaign:
- Published - decides whether your campaign can be viewed by the public or not. You can still look at pages that haven’t been published by adding “?preview=true” to the end of the URL. The “preview” links do this for you automatically
- Name - this is only for internal use so you can find your campaign easily
- Web browser tab title - this is the page title that will be shown in the web browser tab.
- URL Slug - this is the link that your supporters will use to access the page - we recommend customising it with words so that it’s meaningful. Warning: if you change this after you’ve already given out the link, then people will no longer be able to reach it.
Design tab
This is where you can customise the appearance of your Brand Jam.
It automatically uses the default settings from your Organisation, this is something that would have been preset for your organisation when you were set up.
You are free to change any of the settings and it will only affect this Brand Jam:
- Main Logo
- Secondary Logo [optional]
- Browser Icon
- Header Colour
- Background Img
- Button Colour
- Campaign Text - Background Colour
CSS Editor
There is a section in the Design Tab where you can add custom CSS to further customise the look of the page including overriding default colours, fonts etc. This requires some basic web development knowledge.
Campaign Text tab
This is where you edit the text which the supporter sees when they first land on the page:
- Campaign Title
- Campaign Content / Text
- Ask Title / Text
- Final image example
- Get Started button text
Tip:
When copying text from Word, Pages or Google Docs, the formatting will be copied over. Sometimes this can cause design issues. You can quickly remove this by using the “Remove formatting” button or by copying your text into NotePad or TextEdit and making it plain text, then copying it into the Campaign Content/Text box.You can preview the page by first saving your edits then use the preview button next to the name of your Brand Jam at the top of the page.
Brand Jam tab
Background
There are two main options for a Brand Jam: fixed background or multiple backgrounds. Fixed background gives your supporters a single image they can use to create their Brand Jam image, Multiple Backgrounds gives your supporters a choice of several background images to use.
Multiple Backgrounds
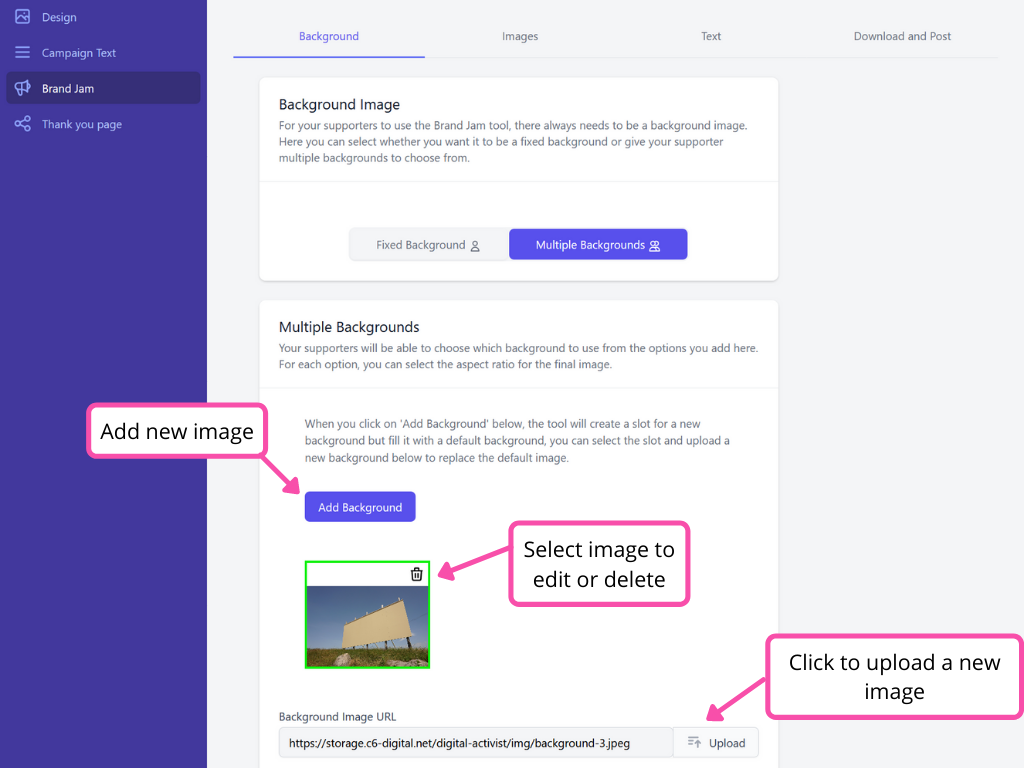
Multiple backgrounds is the default option and is where you can upload the image(s) you want to use. To add a background image:
- Click the Add Background button
- Highlight the new image by clicking on it
- Under Background Image URL click upload
- Select the image file from your computer you want to use
- Click Open
To replace the default image just follow steps 2-5.
Fixed Background
To replace the default image for a fixed background select multiple backgrounds and follow steps 2-5 above.
Aspect Ratio
Depending on where you want supporters to post the final image you can change the aspect ratio. This can apply to a single background image or you can click Apply to All to make all background images use the same aspect ratio.
If your image is not already cropped to the aspect ratio you want to use, the tool will add black borders rather than crop your uploaded image.
Default Text
This is where you can edit the default text for the Choose Your Image page. You do not need to edit this unless it is important for your supporter journey or for non-English campaigns.
Images
This is an optional setting to allow your supporters to add images (out of a selection of images provided by you) on top of the background image. To add an image:
- Click the Add Image button
- Highlight the new image by clicking on it
- Under Background Image URL click upload
- Select the image file from your computer you want to use
- Click Open
Default Text
This is where you can edit the default text for the Add Images page. You do not need to edit this unless it is important for your supporter journey or for non-English campaigns.
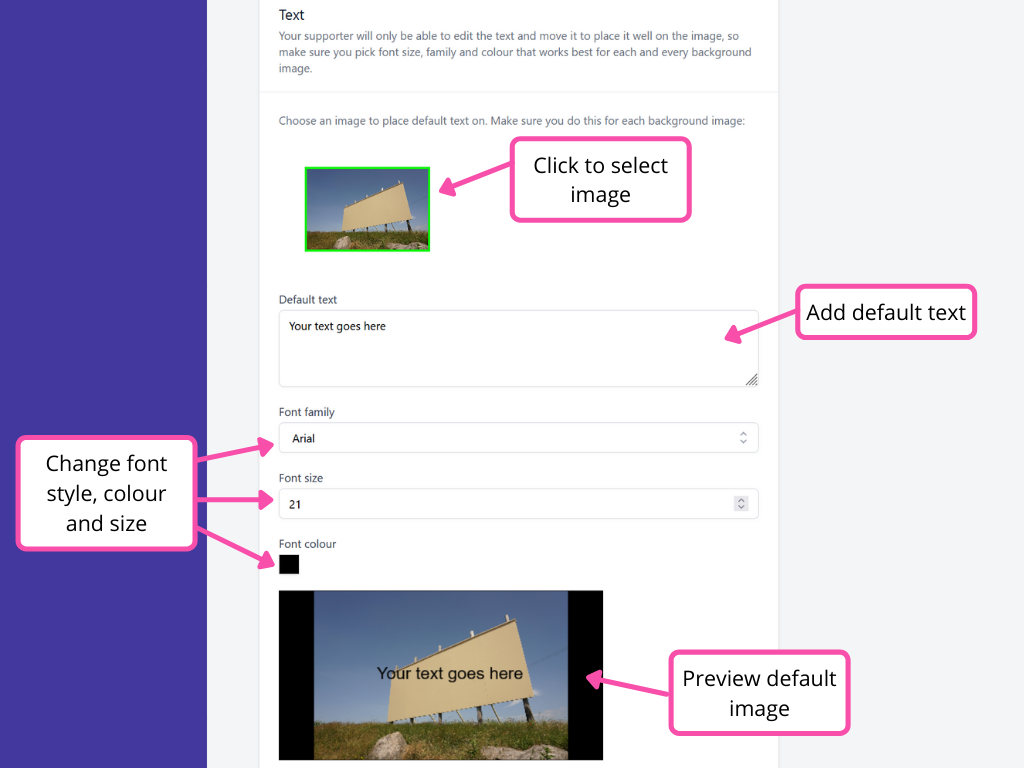
Text
This is where you can set the default text and font settings for your Brand Jam images. You will need to edit the font, size and colour for each background image in your Brand Jam.
It is not possible to add custom or extra fonts at this stage.
Default Text
This is where you can edit the default text for the Add Text page. You do not need to edit this unless it is important for your supporter journey or for non-English campaigns.
Download and Post
This part of the Brand Jam is where the supporter downloads their image and decides which social media channel to post on. Here you can edit the text and choose social media channels options for your supporter to pick from
Default Download Text
This is where you can edit the default text for the Download Your Image page. You do not need to edit this unless it is important for your supporter journey or for non-English campaigns.
Default Post Text
This is where you can edit the default text for the Post Your Image page. You do not need to edit this unless it is important for your supporter journey or for non-English campaigns.
You can also select which social networks you want your supporters to post the image on.
In the Guide Text section you can add any specific guidance for your campaign you want your supporters to follow. For example, if you want them to use a specific hashtag or mention a specific social media account in their posts.
Thank you page tab
Once the supporter has completed the ask, they will be taken to a Thank you page. You can use this page to encourage your supporters to share the Brand Jam with their friends and family:
- Thank you page Title
- Thank you page Text
You can also customise how what your Campaign looks like when it's shared on social media:
- Title
- Description
- Image
Here's a preview of how your campaign will look like when shared:
To help encourage your supporters to share your Brand Jam, you can enable share buttons:
- You can write a pre-filled Tweet for your supporters to share or leave this with the default text or blank.
- To add the link of your storm into the tweet, you just need to type {{link}} where ever you want the link to appear within the text
- WhatsApp [only shows on mobile devices]
- You can write a pre-filled message for your supporters to share or leave this with the default text or blank.
- To add the link of your storm into the message, you just need to type {{link}} where ever you want the link to appear within the text
- You can write a pre-filled email and subject line for your supporters to share or leave this with the default text or blank.
- To add the link of your storm into the email, you just need to type {{link}} where ever you want the link to appear within the text
- Skip
- You can turn on the “Skip” button which allows you to add an extra button under the sharing buttons. You can enter custom text to appear on this button and a custom URL which they will be redirected to after clicking on this button. This button can be helpful if you want your supporters to go to your website, Facebook page or a news article after they have participated.
Publish
When you’re ready to launch your Brand Jam, remember to go to the General tab and click the “Published?” slider. This will make it visible to the general public.
Organisation Admin role
When your organisation or group's account is set up, we provide the Organisation Admin role to the first user so they can change default designs and add users. If you are an Organisation Admin, this will help understand the extra features:
Organisation header
Under the Organisation menu item you can find the options to manage your organisation within Digital Activist. This will only be visible to admins.
Here you can edit:
- Organisation name
- Default main logo
- Default secondary logo
- Default favicon/browser tab icon
- Default background image
- Default colours
-1613822736.png)
Users header
Under the Users menu item you can manage the users within your organisation on Digital Activist. This option will only be visible to Admins.
Here you can:
- Add new users
- Remove users
- Edit user's name or email address
-1613822818.png)
Frequently Asked Questions
How can I build campaigns in languages other than English?
Digital Activist’s default language is English. Our back end as well as the guide is only available in English.
However, the platform accepts a long list of languages when building your campaign. Additionally, all the default text like social media buttons, guide text etc is all editable so you can enter text in other languages which allows you to completely repurpose the campaign pages into other languages.
Can I embed the campaign on my website?
Unfortunately, there isn’t an easy way to embed the digital-activist.org campaigns on websites. However, with the ‘Skip’ button feature on the thank you page, you can ask your supporters to go to your website. This way, Digital-Activist.org can be embedded into a journey that can start on your website and then re-direct supporters back to your website after the have participated in the campaign on Digital-Activist.org
Does this tool collect people’s data?
No. Digital Activist tools do not collect or store users’ personal data. We do use Google Analytics to monitor the level of engagement for different campaigns but the information is anonymised. You can read our Privacy Policy to learn more about how we treat your data and that of your supporters.
Support
For support on issues not contained in this guide, please contact hholmes@greenpeace.org